Yesterday I moved the company’s VMware vCenter Server over to a new Active Directory Domain. This included…
- Removing the server from the old domain
- Changing the IP-address on the server
- Adding the server to the new domain controller
- Making sure the ESX hosts found its “new” owner
Careful planning is the key to success in such operations. Up front, all the ESX hosts had been upgraded and configured in such a way that they already utilised the new infrastructure.
However, a few quirks did arrive, and these are the ones that I will outline here. My guess is that 80% of the people arriving here from a search engine got these problems.
Feel free to jump to that section right away.
For the record; I’m using vCenter Server version 4.1.0, build 258902 on Windows Server 2008 R2 Standard (64-bit).
Sections
Step by Step
There is only a few things you need to make sure before you begin, otherwise you might get a nasty surprise when all your virtual machines reboot.
Also, if you are going to change the IP-address on the vCenter Server, make sure that all your ESX hosts can communicate with the new address range.
The ESX hosts should be able to survive without a panic when the vCenter Server goes down for maintenance. But this can depend on how you have configured your vCenter Server.
1. Remove the vCenter Server from old domain
Log into the vCenter Server with Remote Desktop (or via a console) and remove it form the old domain. Reboot.
2. Change IP-address on the vCenter Server (optional)
Next step depends if you actually need to change the IP-address. If you don’t, you don’t. If you do, have in mind that you will lose connection once you click “ok” or “apply”. Don’t forget to change the gateway and DNS-server addresses as well.
In my case I had to change the VLAN bindings on the switch port. We keep out two domains on separate VLANs.
3. Add vCenter Server to new domain
Add the vCenter Server to the new domain. No surprise here either. Complete the process with a reboot.
4. Update configuration files on ESX hosts (may depend on step 2)
The ESX hosts will most likely acknowledge the vCenter Server before you get to this step because of fingerprints and other magic. But nonetheless, log into the ESX server with ssh and edit the vpxa.cfg file. All the commands here has to be executed as the root user.
(Before you start; log into each ESX host with the vSphere Client and add a user with rights to log in remote via ssh.)
#nano /etc/opt/vmware/vpxa/vpxa.cfg
(Actually this only applies to those who changed the IP-address in step 2)
Change the IP-address listed between the <serverIP> tags in the file, like so:
<serverIp>192.168.20.20</serverIp>
Given that the new vCenter Server address is 192.168.20.20. Save using Ctrl+X.
Also, check the hosts file for any references to the old address or domain name.
#nano /etc/hosts
In my case I changed it from
192.168.10.10 vcenter vcenter.domain.com
to the following
192.168.20.20 vcenter vcenter.domain.lan
and save using Ctrl+X. (Yeah, we change from a .com domain to a .lan domain)
If you have changed the vpxa.cfg file you will also have to restart two management agents on the ESX hosts.
Make sure you haven’t configured auto start/stop on the Virtual Machines at this point. If you have, disable it. Restarting services may lead to an unexpected reboot of all the virtual machines running on the ESX host.
#service mgmt-vmware restart
#service vmware-vpxa restart
5. Restart VMware Virtual Center Service
Log into the vCenter Server and start the services console. Just type “services.msc” in the run dialog.
Find and select the VMware VirtualCenter Server service and restart it. It may also drag another service with itself in the process. No problem.
6. Log in using vSphere Client
Start the vSphere Client and log in using the new domain name and your administrator credentials.
Hopefully everything is up and running and all the ESX hosts are connected. I would advice you to take a look at the KB-articles in the last section before you actually attempt to follow this guid. They will give you a better understanding about how this works.
Now; vCenter Server still contains some references to the old server and/or domain name. So keep reading.
vCenter Still Contains References to the old Server or Domain Name
This can, and mostly will, happen to you too. And the way I found out was when I tried to log into the vCenter Server using vSphere Client and VMware Update Manager (a plugin) complained about being unable to reach the server, referring to the old domain name.
There was an error connection to VMware vCenter Update Manager. The request failed because the server name could not be resolved.
Turns out that the old name is soft coded into different configuration files and registries.

I had to make changes to the following files and places:
- VMware vSphere Client
- Windows Registry
- vci-integrity (only if Update Manager is installed)
- ADSI Edit
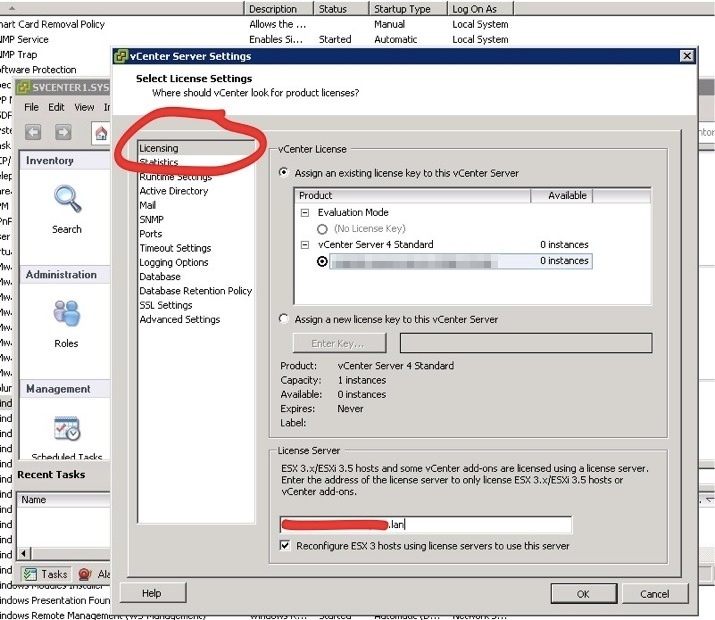
1. vSphere Client changes
In the menu, choose Administration and vCenter Server Settings.
If you are using a license server, and the service is installed on the same machine as the vCenter Server, you have to check the settings under Licensing.

And under Advanced Settings you may have to change the following keys:
- VirtualCenter.InstanceName
- VirtualCenter.VimAPiUrl
- VirtualCenter.VimWebServicesUrl

2. Windows Registry
Using regedit from the run menu, navigate to the following places:
HKEY_LOCAL_MACHINE\SOFTWARE\VMware, Inc.\VMware VirtualCenter
Check the string named VCInstanceId.

Also check the following place:
HKEY_LOCAL_MACHINE\SOFTWARE\Wow6432Node\VMware, Inc.\VMware Update Manager
and update the data on the string VUMServer.
3. Update vci-integrity.xml
This file is found at C:\Program Files (x86)\VMware\Infrastructure\Update Manager\vci-integrity.xml (only if Update Manager is installed on the server).
Search for the tag <vpxdLocation> and make sure the address is correct. It’s either an IP-address or a FQDN. Save the file and exit.
4. ADSI Edit
This little gem is located under Administrative Tools. Start it up and right click on the object ADSI Edit. Choose Connect and use the following settings…
- Name: VC (not important actually)
- Connection Point: dc=virtualcenter,dc=vmware,dc=int
- Computer: localhost:389
Some of the objects here will have unique names, so they will be named differently on your system. So in the simplest form, go through each and every object under OU=ComponentSpecs and OU=Instances and right click and select Properties.
 Scroll through the list and edit every attribute that contains a reference to the old server name.
When all this is done, restart the VMware services or just reboot the vCenter Server. I would recommend a full reboot to make sure the all the changes are active.
Sources
- http://kb.vmware.com/selfservice/microsites/search.do?language=en_US&cmd=displayKC&externalId=1001493
- http://kb.vmware.com/selfservice/microsites/search.do?cmd=displayKC&docType=kc&docTypeID=DT_KB_1_1&externalId=1003490
- http://kb.vmware.com/selfservice/microsites/search.do?cmd=displayKC&externalId=1000163
- http://kb.vmware.com/selfservice/microsites/search.do?cmd=displayKC&externalId=1003312
- http://kb.vmware.com/selfservice/microsites/search.do?cmd=displayKC&docType=kc&docTypeID=DT_KB_1_1&externalId=1003895
- http://kb.vmware.com/selfservice/microsites/search.do?cmd=displayKC&docType=kc&docTypeID=DT_KB_1_1&externalId=1003895
- http://kb.vmware.com/selfservice/microsites/search.do?cmd=displayKC&docType=kc&docTypeID=DT_KB_1_1&externalId=1003490
- http://communities.vmware.com/thread/226681