Category Archives: Linux

OpenWRT – Configuring VLANs and trunks

This weekend I decided to finally upgrade the firmware on my Linksys WRT54GL wireless router. The whole reason I bought this router a few years back was because it supported third-party firmware based on Linux.

Up until now, Linksys firmware has been working great. I didn’t need more than a simple wireless router. But recently I’ve started playing with VMware ESXi, which led to a few virtual servers. And with a few virtual servers, there was also a need to make them accessible from the Internet. With the only way of opening up ports on my router was through my ISPs web page, and that every change needed to be accompanied by a reboot of my router, I decided it was time to set up my own firewall.

Support for VLANs

OpenWRT support VLANs, and this is one of the main reasons I wanted to upgrade to a third-party firmware. Running a firewall with just one network adapter isn’t really possible, unless you can split networks within the same physical medium. And that’s when VLANs come in to the picture. This technology makes it possible to have several different networks within the same physical medium. Even the with the same network addresses.

The firewall, which is a virtual machine, doesn’t know that the host it’s running on only has one network adapter. I gave the firewall three adapters, all connected to different virtual switches. These switches tag their traffic with VLAN data and sends it to my Linksys router, which in also was configured the same way. One port on the router could hand out data for VLAN1, the next port for VLAN2.

In my setup, the traffic coming from Internet is connected to a port in VLAN2. This is sent, along with data in VLAN3, via port 4 to the ESXi host. Here the traffic is divided into virtual switches. One switch for each VLAN. So my firewall is connected to both the switch for VLAN2, and for VLAN3. VLAN2 is being labeled as WAN, while VLAN3 is labeled LAN. I also have a VLAN4 named SERVERS.

Installing OpenWRT

This is easy. If you haven’t installed a third-party firmware on your Linksys, you can use the web interface from Linksys to upgrade. Just as you would if you were to upgrade the original firmware. Download the correct image from OpenWRT, select it in the web interface and click the upgrade button.

After the new firmware is installed, the router will reboot and ready for configuration. By default the routers IP-address is 192.168.1.1. You can log in via telnet with no user name and password. It is advised to set a password at first log in. Doing so, telnet will be disabled and ssh enabled instead.

If you manage to lock yourself out, it’s possible to restart OpenWRT into a safe mode. Just take the power, when it starts up, press any button just when the DMZ light is lid. Now you can access it via telnet at address 192.168.1.1 again, no matter what address you have specified earlier. In safe mode you can change password and reconfigure firewall rules, if you have enabled a rule you shouldn’t have.

Setting up different VLANs (and trunking them)

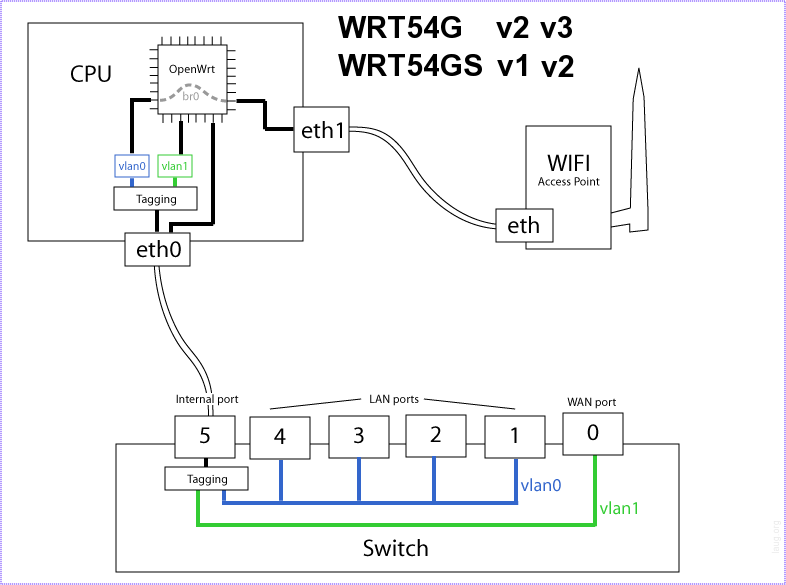
First you should be aware of how the WRT54GL hardware is mapped internally. It is essential to understand the logic when configuring the router. The image shows the default configuration where port 1 – 4 is a regular switch on VLAN0, and the WAN port is separated on VLAN1. If you only want a dumb switch with 5 ports, you could put the WAN port into VLAN0 as well.

WRT54 internal architecture

The configuration file can be found under /etc/config/network. Here we can set the IP-address of the box, but also configure the ports. I only need a dumb switch with VLAN capabilities, so I won’t set up any fancy routing rules in this post.

config switch "eth0"
   option vlan0 "0t 5"
   option vlan1 "0t 5"
   option vlan2 "0t 4 5"
   option vlan3 "0t 3 2 5*"
   option vlan4 "0t 5"

In this setup I have created five VLANs, three of which are unused at the moment. VLAN3 is the default VLAN, as marked by the asterisk (*). Port 5, the internal, has to be included. Data on LAN port 4 (which is internally mapped as port 0), is tagged, which basically means it’s a trunk. If a port isn’t tagged, it can’t belong to more than one VLAN (except the internal port 5). If a port is tagged, it can’t be used by a computer which doesn’t support trunk or tagging.

My Internet connection is connected to the WAN-port on the router, also known as internal port 4. It belongs to VLAN2, and is tagged on LAN port 4, which is known as internal port 0. On the other side of LAN port 4 is my ESXi server, which supports trunking (surprise). VLAN2 then goes into my firewall, on the other side of my firewall is VLAN3, which goes over the same cable back to the OpenWRT box, which in turn distributes it to my main computer and media center on LAN port 1 and 2.

Conclusion

Linksys WRT54GL is a great product, and with third-party firmware such as OpenWRT, it’s even greater. This box can be transformed from a boring wireless router, to a full blown firewall if needed.
 

Upgrading Ubuntu 6.06 LTS to 8.04 LTS

Today I upgraded from Ubuntu 6.06 to 8.04. The process was fairly painless thanks to a guide I found floating around on the Internet by Ronald Bruintjes. Thanks!

I thought about posting it here, but that wouldn’t be fair to the author. So, please visit his site for more information.

However, be prepared to answer some questions regarding different configuration files. More specifically if you want to keep the original, or overwrite with a new one. I myself have edited a quite a few configuration files over the last year, so I had to do a manual screening before I decided what to do.

Filesystem mounted as read-only during boot

Today I had a case where a server mounted the root filesystem as read-only during boot. To make a short story shorter, check /dev/null.

After doing some searching in the logs I found a few lines complaining about /dev/null also being read-only filesystem. So I checked the permission with ls -al /dev/null, and it turned out this had been changed into a regular file rather then the special file it’s supposed to be.

The fix is easy. Delete the file called /dev/null and re-create the special device with the command mknod -m 666 /dev/null c 1 3.

You can also read about how to create this special file by reading the man-pages. Command: man 4 null.

NimBUS and Regular Expressions

I recently had to configure NimBUS to send alarm upon detecting a specific log entry in /var/log/messages on a Linux system. Because this alarm was supposed to be sent by SMS , I didn’t want it to send more than one message. But since our log file has a timestamp, each entry were we found a match would be handled as a unique alarm, thus sending one message for each log entry where the mach was found.

If the string we were looking for first would appear, it would most likely show up somewhere between 5 to 50 times within an hour.It’s hard to guess, really. But we are looking for a problem that won’t solve itself, and the program checking for this problem will continue to write to the log file upon each encounter with the problem.

The way to solve this kind of problem, where we want to ignore the timestamp, is to understand how NimBUS handle incoming alarms. If it receives the same message two or more times, it would just upper the count, instead of creating a new entry in the alarm window.

Lets say our log file looks like this:

Mar 14 14:55:35 ErrorCheck: Oh noes, error detected in A51
Mar 14 14:57:32 ErrorCheck: Oh noes, error detected in A51

We only want to get one alarm, but with a count of two (actually one), not two alarms which is identical except for the timestamp. First, set up logmon to detect the correct line in the log file using regular expressions. The logmon probe supports both pattern recognition and regular expressions, so make sure to use the right one. Regex starts and end with a forward slash, otherwise it assumes pattern is used.

In this case we can use the following simple regex:

/.*ErrorCheck.*/

Of course my regex where more advanced since I had to detect other parameters as well, since the output of our program also had to be checked.

Now, with this regex in place, we are at the point where every entry will be treated uniquely. But logmon also give you the possibility to construct your own message, and to define variables. And that is what we have to do.

We can construct variables both by row or column number. Since this is a single line, we will use the column offset. So, let us create the variables:

prog = column number 4
error = column number 10

This is only a simplified view. The logmon probe has a user interface for this. Right click, add new variable (or something like that).

When this is done, add your own message text in the field saying so:

$prog: Error detected in $error

When this is set as the outbound message, NimBUS will count it instead of creating a new entry in the alarm view each time, since the message now is identical. If the error code changes, a new alarm will be sent.

Short version:

Create your own output message when using NimBUS logmon probe on a log file which has a timestamp.

(This short version was a lot better and could have saved me some time)

Running Web Server as a Virtual Machine

For several months now I’ve been planning to virtualize my home server. That’s the server hosting this blog, among other things. For starters it would give me some more room to test different applications on separate operating system, but without the hassle of dealing with several physical computers.

One of my ideas is to test web application prior to deployment. This is kind of hard now that I only have one machine. It’s would be shameful if I accidently killed the web service because of a faulty configuration. Also I have a few projects which I want to separate from the machine visible on the internet.

VMware Server is a free product which can be installed on top of either Windows or Linux, so it’s not a bare-metal hypervisor. I recommend running it on top of Linux for minimal footprint, not to mention all the rebooting you have to do with Windows. A minimal Ubuntu server installation takes less than 1GB of disc space, and use next to nothing when it comes to terms of memory.

For the moment I’m doing some testing with one mySQL server, one Apache web server and one server running Varnish, which is a cache/proxy service. It’s not because I’m expecting high load in the near future, but it’s an interesting solution.

Anyway; the next few months I expect this blog to focus more on virtualization, but I can’t guarantee anything. I would be satisfied if I keep writing semi regular, no matter the topic.