In a personal/work related note; I’ve been ITIL 2011 ® Foundation Certified.
(Sorry in advance to everyone anyone searching for actual information about ITIL.)
In a personal/work related note; I’ve been ITIL 2011 ® Foundation Certified.
(Sorry in advance to everyone anyone searching for actual information about ITIL.)
Since I received my Lenovo ThinkPad T520, I’ve been experiencing some really bad audio. Playing video at the same time only made it worse, at least that was my initial impression. The problem mainly consisted of crack and pops in the speaker. I downloaded a small tool called DCP Latency Checker, and discovered that the problem was due to high latency every now and then. I’m talking about latency in the 90000+ µs range.
For the record; I’m using Windows 7 (64-bit) with Service Pack 1.
To make a long story short. I search the internet, and found various answers. My first break through was when I disabled the network card, the wired one. The second came from a friend of mine.
So what I ended up doing, in this order, was downgrade the network driver, since the newest driver wasn’t working properly (duh). Searching for Intel 82579LM eventually led me to HPs website. I’ve tried two or three versions from Lenovo’s site, and two other directly from Intel, with only minor improvements. Turns out that the old driver from HP (SP52209.exe), dated 2010, is the best driver I’ve tested so far. Also, I disabled the ATA Channel 3, and eventually Channel 4 as well. I did try the newest network driver with the two ATA Channels disabled, but the problem reappeared.

So there you have it, my solution to the problem, disable a couple of ATA Channels and downgrade the network driver to an old version fresh from HP.com.
When trying to upgrade my first generation iPad to the new and shiny iOS5, I received the following error message in iTunes:
Error 1611: This error may indicate a hardware issue with your device.
 This upgrade being done on a Windows machine, I did the most obvious thing second; restarted the computer. The first thing I tried was to close and reopen iTunes.
I search online and found a few posts regarding this issue, both on Mac and Windows. And most of them mentioned uninstalling iTunes and removing a few key files, then reinstall the lastest version of iTunes.
However; I did notice Windows complaining about an unknown device being plugged in. Knowing how Windows handle device drivers, I decided to try one more thing before reinstalling iTunes.
So, here’s my tip. Try unpluging your iDevice, and reconnect it to another USB port. This will force Windows to detect this as a new device, and reinstall the necessary drivers. Worked for me.
Yesterday I moved the company’s VMware vCenter Server over to a new Active Directory Domain. This included…
Careful planning is the key to success in such operations. Up front, all the ESX hosts had been upgraded and configured in such a way that they already utilised the new infrastructure.
However, a few quirks did arrive, and these are the ones that I will outline here. My guess is that 80% of the people arriving here from a search engine got these problems.
Feel free to jump to that section right away.
For the record; I’m using vCenter Server version 4.1.0, build 258902 on Windows Server 2008 R2 Standard (64-bit).
There is only a few things you need to make sure before you begin, otherwise you might get a nasty surprise when all your virtual machines reboot.
Also, if you are going to change the IP-address on the vCenter Server, make sure that all your ESX hosts can communicate with the new address range.
The ESX hosts should be able to survive without a panic when the vCenter Server goes down for maintenance. But this can depend on how you have configured your vCenter Server.
Log into the vCenter Server with Remote Desktop (or via a console) and remove it form the old domain. Reboot.
Next step depends if you actually need to change the IP-address. If you don’t, you don’t. If you do, have in mind that you will lose connection once you click “ok” or “apply”. Don’t forget to change the gateway and DNS-server addresses as well.
In my case I had to change the VLAN bindings on the switch port. We keep out two domains on separate VLANs.
Add the vCenter Server to the new domain. No surprise here either. Complete the process with a reboot.
The ESX hosts will most likely acknowledge the vCenter Server before you get to this step because of fingerprints and other magic. But nonetheless, log into the ESX server with ssh and edit the vpxa.cfg file. All the commands here has to be executed as the root user.
(Before you start; log into each ESX host with the vSphere Client and add a user with rights to log in remote via ssh.)
#nano /etc/opt/vmware/vpxa/vpxa.cfg
(Actually this only applies to those who changed the IP-address in step 2)
Change the IP-address listed between the <serverIP> tags in the file, like so:
<serverIp>192.168.20.20</serverIp>
Given that the new vCenter Server address is 192.168.20.20. Save using Ctrl+X.
Also, check the hosts file for any references to the old address or domain name.
#nano /etc/hosts
In my case I changed it from
192.168.10.10 vcenter vcenter.domain.com
to the following
192.168.20.20 vcenter vcenter.domain.lan
and save using Ctrl+X. (Yeah, we change from a .com domain to a .lan domain)
If you have changed the vpxa.cfg file you will also have to restart two management agents on the ESX hosts.
Make sure you haven’t configured auto start/stop on the Virtual Machines at this point. If you have, disable it. Restarting services may lead to an unexpected reboot of all the virtual machines running on the ESX host.
#service mgmt-vmware restart
#service vmware-vpxa restart
Log into the vCenter Server and start the services console. Just type “services.msc” in the run dialog.
Find and select the VMware VirtualCenter Server service and restart it. It may also drag another service with itself in the process. No problem.
Start the vSphere Client and log in using the new domain name and your administrator credentials.
Hopefully everything is up and running and all the ESX hosts are connected. I would advice you to take a look at the KB-articles in the last section before you actually attempt to follow this guid. They will give you a better understanding about how this works.
Now; vCenter Server still contains some references to the old server and/or domain name. So keep reading.
This can, and mostly will, happen to you too. And the way I found out was when I tried to log into the vCenter Server using vSphere Client and VMware Update Manager (a plugin) complained about being unable to reach the server, referring to the old domain name.
There was an error connection to VMware vCenter Update Manager. The request failed because the server name could not be resolved.
Turns out that the old name is soft coded into different configuration files and registries.

I had to make changes to the following files and places:
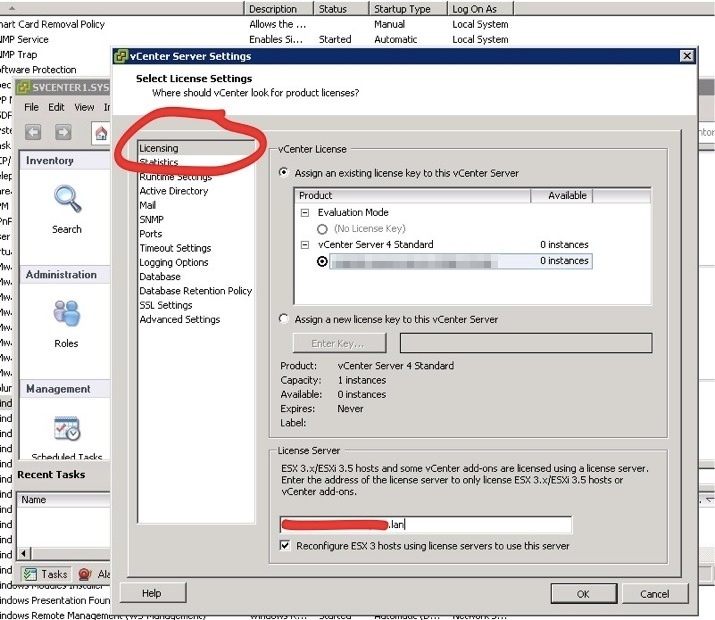
In the menu, choose Administration and vCenter Server Settings.
If you are using a license server, and the service is installed on the same machine as the vCenter Server, you have to check the settings under Licensing.

And under Advanced Settings you may have to change the following keys:

Using regedit from the run menu, navigate to the following places:
HKEY_LOCAL_MACHINE\SOFTWARE\VMware, Inc.\VMware VirtualCenter
Check the string named VCInstanceId.

Also check the following place:
HKEY_LOCAL_MACHINE\SOFTWARE\Wow6432Node\VMware, Inc.\VMware Update Manager
and update the data on the string VUMServer.
This file is found at C:\Program Files (x86)\VMware\Infrastructure\Update Manager\vci-integrity.xml (only if Update Manager is installed on the server).
Search for the tag <vpxdLocation> and make sure the address is correct. It’s either an IP-address or a FQDN. Save the file and exit.
This little gem is located under Administrative Tools. Start it up and right click on the object ADSI Edit. Choose Connect and use the following settings…
Some of the objects here will have unique names, so they will be named differently on your system. So in the simplest form, go through each and every object under OU=ComponentSpecs and OU=Instances and right click and select Properties.
 Scroll through the list and edit every attribute that contains a reference to the old server name.
When all this is done, restart the VMware services or just reboot the vCenter Server. I would recommend a full reboot to make sure the all the changes are active.
Just a short post about camera flashes and trigger voltage.
Canon specifies a safe trigger voltage up to 6 volts using the hotshoe on their digital cameras. If it’s higher, it might damage the camera. So I have measured the trigger voltage on two older flashes I have lying around, since I didn’t get (m)any hits searching the interewebz.
Pentax AF-330FTZ has a trigger voltage of 3.14V
Hanimex 325AZ has a trigger voltage of 110V
So the Pentax AF-330FTZ should be safe. Hanimex 325 however, isn’t. What’s kind of scary is that I have used the Hanimex on several occasions on my 350D. Luckily no harm done (as far as I can tell).
Update: Found this web page explaining some more around this issue.
I take this to mean that all Canons DSLRs newer than the 350D, as well as all the professional models, can use flash with trigger voltages up to 250 volts in their hot-shoe. However, 6 volts is the safe limit for the D30, D60, 10D, 300D, and Canon’s digital compact cameras.